Mold infestations often begin when rainwater pours down recently damaged roof tiles.
Because such infestations often happen out of sight, mold problems can get out of control before they’re discovered.
If you suspect your roof has sprung a leak, read on to learn how to make a thorough (and safe) inspection.
Spotting Leaks
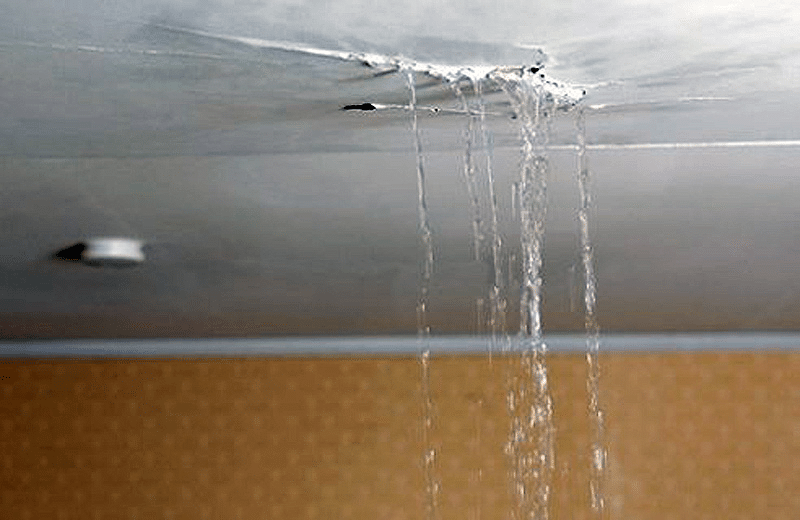
Obvious signs of a leaky roof include water running down walls and light seeping through ceiling cracks.
If you don’t spot any bedroom waterfalls, it’s still highly possible you still have a leak. Finding it will take a bit more work.
Often, roof leaks go undiscovered when water damage happens out of sight of your home’s everyday living spaces. To know for sure, we’ll have to inspect.
Finding Your Roof Leak from the Exterior
We recommend you check out the exterior from ground level before climbing.
Walk around your home’s exterior to visually inspect the roof. Keep track of damaged or missing shingles, scattered black dots, or any gaps in the metalwork surrounding ventilation piping and chimneys.
Any roof tiles that stick out–differing in size, color, and texture are likely to be the offender in question. If you are confident you found it, call a mold remediator for an assessment. Otherwise, you’ll have to move your search to the attic.
How to Inspect Your Attic for Leaks

The easiest way to spot a roof leak is to visit your attic on a rainy day.
Make sure you inspect your attic for dark or soft spots and paint peeling off the ceiling. Often, these leaks originate from insulation soaking up rainwater.
Since water travels down, the water leak source should be directly above the water-damaged spot in your attic.
Take note of any difference in atmosphere and smell. If you sense significantly more humidity and a strong smell of moldy vegetables, those are clear signs of a moisture issue, if not mold.
If you’ve found any mold in the attic, you likely have a roof leak. Calling a professional remediator is your best bet for a job done right.
Perform a Roof Rain Check
If your visual inspection didn’t turn up any results, and you’re still sure you’ve got a roof leak, we can turn to water and gravity for help.
In a roof rain check, you’ll go to the attic when it’s raining and look for water leaking from above. If the weather won’t cooperate, grab a friend or roommate to spray your hose over your roof (Instructions for safely accessing your roof are below).
If you’re not interested in waiting for the weather to cooperate, get someone else to run a hose over potential leak areas. Meanwhile, head to your attic with a flashlight, and inspect the roof for water droplets or light reflections.
How to Safely Get On Your Roof

Patch your leaky roof, but you’ll want to do so very carefully—such accidents can be deadly.
If you get nervous on ladders, then do the following:
Before you head to the roof, put on your grippiest shoes; this will help you gain traction on asphalt. Next, set your ladder next to the wall you intend to climb, and ensure both legs are on firm footing (We strongly recommend getting a spotter while you ascend and descend).
If you’re using an extension ladder, make sure it’s tied off to avoid slippage. When climbing, place your hands on the rungs,—not the rails—this way you can catch yourself with your hands if you slip.
Climb until your hips are just above the gutter. Then, lift your non-dominant foot up one rung and set it down in the middle. Finally, take your dominant foot, and swing it around to land on the roof.
To get down, place your hand at the top rung of the ladder with both hands, then carefully swing your legs to an accessible rung below (you’ll probably have to adjust your wrists while swinging your legs over).
Mold is More Than an Inconvenience; Stay Ahead With Regular Inspections
Mold often appears in highly inconvenient areas: between walls, in basement plumbing rooms, laundry rooms, and—of course—the roof. So long as you make regular inspections and maintain low humidity levels, you can prevent mold infestations in the future.
Why MoldGone
At MoldGone, we offer FREE mold inspection. Our mold removal and mold remediation services are available at reasonable prices. Call us today at 240-970-6533 or Click here to schedule your appointment.

Mold in the workplace is a problem.
While it’s not quite as poisonous as many think, mold can be severe for those with allergies, asthma, or immune deficiencies. Not only that, excessive mold exposure can be harmful to anyone’s health, making its prevention a vital necessity.
Read on to learn about the signs and symptoms of mold, how to inspect for it, and how to prevent future workplace infestations.
“Sick Building Syndrome” & Mold
Sick building syndrome is a condition where occupants of the same building develop acute health symptoms that appear to originate within the building.
Typical symptoms include sinus irritation, unusual fatigue, irritated eyes, or dry, itchy skin. SBS is a growing occupational hazard across buildings in the United States and Europe. Often, mold exposure is the root cause.
Symptoms of Mold Exposure
The severity of symptoms experienced by individuals exposed to mold differs depending on preexisting conditions, especially allergies, asthma, and compromised immune systems.
Depending on their physiological makeup and length of exposure, excessive mold can result in mold allergy or toxicity. Mold allergy originates from inhaled mold spores; symptoms are typically less intense and include sneezing, coughing, or watery eyes (If the individual has asthma, they may also experience wheezing or coughing).
Mold toxicity, however, occurs when an excess of mold toxins causes inflammation, featuring more uncommon symptoms like exhaustion, sinus, headaches, and more. The prognosis is again more severe for those with asthma or the immunocompromised.
How Does One Test for Mold?

It’s tough to tell the difference between a cold and a mold allergy, making testing for mold an iffy prospect.
Unfortunately, most commercial mold tests aren’t reliable. Since small volumes of mold particles are airborne in just about any environment, such tests frequently turn back false positives. That’s why we recommend a visual inspection first.
How to Inspect for Mold in Your DC Workplace
You should perform a thorough visual inspection if you know your facility has been previously exposed to mold, excess moisture, or water damage.
How?
Look for signs of moisture, rot, and decay around the work environment. Check around any water-based appliances, water pipes, window sills, basements, and laundry rooms. Note any excess humidity and any other unusual conditions.
Prevent Mold Growth By Limiting Moisture Growth
Mold prevention is actually much easier—and cheaper—than mold remediation.
Since mold depends on moisture to grow, much of mold prevention is moisture management. In addition to rapidly responding to water damage, repair leaky pipes, the roof, and any damaged plumbing systems. Also, ensure adequate drainage at the building’s foundation.
Purchase dehumidifiers and industrial fans to help improve ventilation and quicken water evaporation. So long as the humidity stays between 40 and 60 percent, you can prevent mold growth. Note also that humidity levels exceeding 60 percent are highly prone to decay.
Why MoldGone
At MoldGone, we offer FREE mold inspection. Our mold removal and mold remediation services are available at reasonable prices. Call us today at 240-970-6533 or Click here to schedule your appointment.

Most people know only one thing about mold’: it shouldn’t be in your home.
Seeing as how fungal biology isn’t in most school’s curriculum, we’ll forgive the general populace’s ignorance.
That said, our unfamiliarity with mold often gets us into trouble when we attempt an at-home remediation. For just such occasions, the experts at Moldgone have outlined how to avoid the biggest and most common mistakes.
Mistake #1: Underestimating your Mold Problems Seriousness
Mold is very often hidden in out-of-sight locations embedded between walls springing from leaking water pipes in the basement or forming around water-based appliances.
This makes mold very hard to identify — even when a substantial infestation is already underway. Because they’re so easy to miss, many wind up remediating what turns out to a fraction of the full problem.
Not only does this cause many to overlook existing issues, it also leads to residents letting hidden mold infestations grow out of control.
The first step in any remediation process should involve a rigorous search for the source of moisture.
Mistake #2: Attempting DIY Mold Remediation on a Substantial Growth
Not every mold infestation is the same.
While DIY mold remediation is feasible in a number of circumstances, we all too often see customers attempting remediation projects on large-scale infestations.
A good rule of thumb: if you’re mold patch is the size of a bath towel- 10 ft or around 10 square feet -you can handle it yourself. Any larger, and you’ll need a professional remediator.
Mistake #3: Cleaning mold without addressing moisture and humidity

Mold only grows in the right conditions. It needs moisture, oxygen and a food source to thrive. Many DIY remediate remediators make the mistake of forgetting this fact, leading to prompt mold regrowth.
This is why we recommend it the first stage of any home remediation project should be focused on uncovering what’s causing the conditions that allowed for mold to grow. Do that, and you’re not likely to see a recurrence.
Mistake #4: Dismissing Health Concerns During the Remediation Process
While the exact degree of health risk in mold is still scientifically uncertain, it’s not the ill effects that have been noted are far from light.
DIY remediators are putting their health in their hands when they take on a remediation project whether they know it or not. As such, it’s critically important that any DIY remediators take the necessary safety precautions to avoid contempt contamination. That means wearing clothes that cover you from head to toe, clothes you don’t mind throwing out after.
Mistake #5: Not Performing a Full Post-Remediation Cleanup

Mold remediation requires a thorough and careful cleanup job. Not just because of the health risks involved but also because disturbing mold patches can quickly lead to new mold growth, as spores fill the air and land on moist surfaces.
The next time you take an at-home remediation project, take pains to avoid spreading it further. To properly prep for your next remediation, section off the mold-infested areas by draping plastic sheeting over all exits.
You’ll also want to equip yourself with multiple trash bags–place them inside your protected area. Throw away all infected materials within the infected area. After remediation is complete, dispose of all the protective clothing you had on.
Once every contaminated element is in the trash bag, wrap that bag in another one before throwing away the materials in an outdoor trash.
Control Moisture, Control Mold
DIY mold remediation can be effective as long as you don’t take on more than you can handle and take the proper precautions. But remember, if you spot a mold patch bigger than a bath towel or are immunocompromised, call in the professionals.
Why MoldGone
At MoldGone, we offer FREE mold inspection. Our mold removal and mold remediation services are available at reasonable prices.
Call us today at 240-970-6533 or Click here to schedule your appointment.
Recent Comments