Dealing with mold right now? MoldGone inspects and remediates across DC, suburban Maryland, and Northern Virginia. Call 240.970.6533 or schedule an inspection.
Most homeowners have never watched a mold remediation happen. They approve a scope of work, leave for the day, come back to a sealed-off room and a stack of plastic in the driveway, and hope it went well.
That’s a problem, because the difference between a job done correctly and a job done fast is almost entirely visible in the setup. If you know what you’re looking at, you can walk in at ten in the morning and tell in thirty seconds whether the crew is protecting the rest of your home or just tearing out drywall.
Here’s what it should look like, in order.
The Short Answer
A properly contained remediation has these elements, and you can see most of them from the doorway:
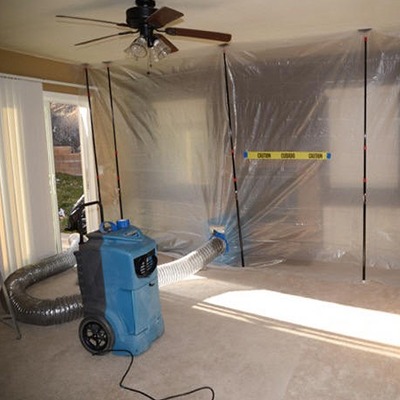
- A sealed work area in heavy poly, vents in that space taped off.
- Negative air pressure, so air flows in and never out.
- HEPA filtration inside containment and on the cleanup vacuums.
- A decontamination chamber at the entry.
- Personal protective equipment on everyone inside.
- Material bagged and sealed before it travels through your house.
- A corrected moisture source, because the water is the real problem.
- Post-remediation verification confirming the work achieved its goal.
Why Containment Exists at All
Remediation is a demolition process, and that’s the part nobody explains. To remove mold from a wall cavity, someone has to open the wall. Cutting drywall, pulling insulation, and scraping framing all disturb material that is actively holding spores. A problem sitting inside one wall becomes airborne particulate in the room.
Without a barrier, that particulate goes wherever the air in your house goes. Down the hall. Up the stairwell. Into the HVAC return, then out every supply register. You end up with a remediated bathroom and a contaminated second floor.
Containment is what makes the disruption safe. The mess stays in a box you built on purpose and leaves through a filter, not through your living room.
Step 1: Sealing the Work Area
The barrier itself is simple. Done right, it is also unmistakable.
- 6 mil polyethylene sheeting. Six mil holds a pressure differential without tearing at the seams and survives a crew working against it all day. Painter’s plastic is not the same product.
- Sealed at every edge. Floor, ceiling, and both side walls, taped continuously. A barrier with gaps is a suggestion.
- Supply and return vents sealed inside the work area. The step most often skipped. An unsealed return turns your ductwork into a distribution system.
- Floors and pathways covered. Poly runs from the entry along whatever route material and equipment will travel, so foot traffic isn’t grinding debris into your hallway.
DMV note: Row homes in DC and Baltimore complicate this. Shared party walls, narrow floor plans, no side yard to stage out of, and often no way to reach a rear basement or third-floor bath without crossing the whole house. Containment in a row home usually means a longer protected corridor than the size of the job suggests. Suburban Maryland finished basements bring their own version, since the air handler frequently sits in the space being remediated.
Step 2: Negative Air Pressure
This is the piece that separates real containment from plastic decoration.
A negative air machine is a filtered blower. It pulls air out of the sealed work area, filters it, and exhausts it. Because it removes air faster than air leaks back in, pressure inside containment drops slightly below the rest of the house.
The result is directional airflow. Air moves into the containment through every small gap, and never out of it. If a seam opens or a doorframe seals imperfectly, the leak works in your favor.
- Exhaust outside. Ducting the discharge through a window or door is what creates the pressure differential, because air is being removed from the sealed space and sent out of the building. This is the part that makes it negative air rather than just filtration. A machine discharging back into the same sealed space isn’t establishing negative pressure at all, it’s running as an air scrubber, which is a different job.
- The visible tell: look at the poly. On a working setup the sheeting is sucked inward, drawn tight and rippling slightly. Slack plastic hanging flat means nothing is pulling on it.
That second one is the easiest quality check a homeowner can run. No manometer required, just look at the plastic.
Step 3: HEPA Filtration
HEPA is a defined performance standard, not a marketing word. A true HEPA filter captures 99.97 percent of particles at 0.3 microns. Mold spores are considerably larger than that, which is why HEPA is the right tool here. It shows up in two places:
- Air scrubbers inside containment. These cycle the work area’s air through HEPA filtration continuously while the disruptive work happens, and on most jobs keep running through cleaning and drying.
- HEPA vacuums for cleanup. A standard shop vac picks up debris and then blows the fine fraction back into the room through its exhaust. That is worse than not vacuuming at all.
Step 4: The Decontamination Chamber
The decon chamber is a small sealed anteroom on the containment entry, usually with two or three flapped poly doorways in sequence, so the work area is never open to the house at the same moment the outer flap is.
It exists for one reason: a worker who spent two hours cutting contaminated drywall is covered in it. Walking straight out undoes the entire setup. Inside the chamber, workers remove and bag disposable coveralls, clean off, and step out. Tools get wiped down before they leave. It is the element most commonly missing from a rushed job.
Step 5: Personal Protective Equipment
PPE protects the crew, and it tells you how seriously the job is being taken. Expect disposable full-body coveralls with hoods, gloves, eye protection, and respiratory protection matched to the scope, from N-95 respirators up to half-face or full-face respirators with particulate cartridges. A crew cutting moldy drywall in t-shirts is telling you something about the rest of the process.
Step 6: Removal and Bagging Inside Containment
Contaminated material gets sealed before it moves. Drywall, insulation, carpet pad, and anything else coming out is bagged inside the work area in heavy-duty disposal bags, sealed and wiped down before passing through the decon chamber, then taken straight out of the building.
An open bag of moldy insulation carried down your stairs sheds the whole way. Everything containment was built to prevent happens in that one trip.
Step 7: Cleaning and HEPA Vacuuming
Removal is not the end. Once the affected material is out, remaining surfaces get cleaned: HEPA vacuumed, damp wiped with an appropriate cleaning agent, then HEPA vacuumed again on many jobs. Framing, subfloor, joists, adjacent wall faces, and any contents that stayed in the room.
The IICRC S520 standard is the industry standard of care for mold remediation, and its underlying principle is that mold gets physically removed rather than killed in place. Dead spores still cause reactions. Cleaning is what reduces the contamination.
Step 8: Drying and Fixing the Moisture Source
Mold grew because something was wet. If that condition is still there when the plastic comes down, you have bought yourself a few months. So the assembly gets dried with air movers and dehumidifiers until materials read at appropriate moisture levels, and the source gets corrected: the failed supply line, the foundation seepage, the roof leak, the bath fan venting into the attic.
DMV note: Northern Virginia crawl spaces are the region’s most common repeat offender. A vented crawl space in Fairfax, Prince William, or Loudoun county pulls humid summer air across cool surfaces all season, and the condensation feeds growth on the joists and subfloor above. Remediate the joists without fixing the vapor barrier, the drainage, and the ventilation, and it looks the same again in eighteen months.
Step 9: Post-Remediation Verification
The last step confirms the work did what it was supposed to do. Verification typically includes a visual inspection while containment is still standing, moisture readings confirming materials are dry, and air or surface sampling compared against a control, usually outdoor air or an unaffected room. The goal is to establish that the space is no longer a source of elevated spore levels before the barrier comes down.
That matters twice. It confirms the remediation achieved what it set out to, and the documentation holds value later, particularly if you sell the house and a buyer asks what happened.
Containment comes down after verification, not before.
What a Shortcut Job Looks Like Instead
Here’s what to look for when you walk in on a job in progress:
- No containment at all on a significant job. Open demolition in an unsealed room.
- The HVAC running during remediation. A system moving air while a wall is open is sampling the work area and redistributing it building-wide.
- Vents inside the work area left uncovered. Same failure, one level more specific.
- No negative air machine, or plastic hanging slack. Nothing pulling the barrier inward means no pressure differential.
- A single flap over a doorway with no decon chamber, on a job large enough to warrant one.
- Debris carried through living space in open bags, buckets, or wheelbarrows.
- A shop vac instead of a HEPA vacuum, or a crew with no PPE.
- Containment torn down before anyone verified anything.
None of that is exotic. It’s all visible from a doorway in under a minute, which is the whole reason this post exists.
The Bottom Line
Containment is not an add-on to a mold job. It’s the part that keeps the remediation from making your house worse. Sealed poly, negative pressure holding the barrier taut, HEPA filtration inside, a decon chamber at the entry, material bagged before it moves, the water source corrected, and verification confirming it worked. Recognize those things and you can evaluate the work you’re paying for.
MoldGone handles inspection, containment, remediation, drying, and post-remediation verification across DC, suburban Maryland, and Northern Virginia, with one accountable team from the first assessment through final clearance.
Want to see the process done properly? Call MoldGone at 240.970.6533 or schedule an inspection.
Remediation procedures described here follow the IICRC S520 standard, the industry standard of care for professional mold remediation. Scope, containment design, and equipment for any specific job are determined by on-site assessment.